Pages

Showing posts with label fabric. Show all posts

Wednesday, July 13, 2011

I finished a Quilt!

Can you believe it?
I hardly can. 
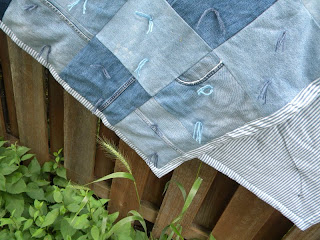
I finished my jean quilt.
My awesome sister in law gave me these jean squares
already cut out.
Isn't she so nice? She had extras.
The only issue is that she gave them to me...
I think over 5 years ago!


Right when she gave them to me I put them together
but didn't really get around to anything else...
A couple years later, my grandma was 
cleaning out her fabric stash
(I love it when she does that)
and this huge piece of striped flannel fell into 
my wide open arms.

Then a couple years later I realized that we were moving
far away from any extra quilt tie-ing fingers,
So I ran to the fabric store and got some batting
(with my coupon, of course)
and my mom and my sis helped me tie it
literally just days before we made the big move last summer.

And that's how it sat for a year.
(I'm a slow mover, aparently. Sorry, jean quilt)
I pulled it out the other day and trimmed it


and pinned it


and finished the whole project in about an hour and a half.

Now we can officially go camping and picnicking on our family quilt
(because it's not camping if you don't have a camping blanket).
I am so excited to put this baby to some good use!

Monday, July 11, 2011

Yoyo Hair Clippy

I made these hairclips with my sister, Nan. 
Her little girl and my miss G were born within four days of each other. 
At the same hospital. 
By the same doctor.
Cousin twins!
So, naturally, we have to make matchy things  for them to wear....


Start with a circle of fabric, 
stitch with a needle and thread around the entire edge,
and pull the thread tight
making all the edges come together
creating the Yoyo:


Glue your desired hair fastener on the back:
We used hot glue.


And glue something pretty on the front. 
We used my moms amazing assortment of buttons
and came up with all sorts of cute hair clips.


It's nice to have some of these on hand to give as gifts as well.

Friday, June 10, 2011

Toddler Shirt


This. is. adorable. 

My mom got me this big chunk of fabric while she was in town last so I cold make a bunch of summer outfits for my little G. I love the orange, it's so bright and happy and, well, summery. I found this tutorial for the "Leah Shirt" and absolutely fell in love with it. Starting off with my pieces all cut out, I followed Jess's directions and just guessed at the sizing. I sort of traced one of miss G's shirts that fits her right now and crossed my fingers that my pieces would end up the right size.  It worked pretty well.


I made my own biased tape that was smaller than regular biased tape, I didn't want the edging to be the focus of this shirt. Regular biased tape seemed to be a little too overwhelming for how small the shirt is.


Keyhole back


And, of course, the yo-yo embellishment


I think I'll end up making about 27 of these shirts before I get tired of them... 
They are so easy and so so so sweet.

Monday, April 11, 2011

Holy Hannah Batman

That was a close call. I don't even know what that was. As many of you know, My Domestic Design took a little vaca today without giving anyone a notice. Not even me. I logged on earlier today to put up a post... and my blog was gone. yep. deleted. It still hasn't told me where it went. Luckily amidst all of my super freaking out moments it came back. Thank you for returning, blog. I missed you. On another note, I've been finding inspiration in different places....

New fabric to make miss G summer outfits


A little evening sunshine


 hubby's bike.. that's going to take a hike 
(it's getting kicked out of the club, but I think he took a great picture of it...)


and a neat chair at the train museum we went to this weekend


I also made this yummy Upside-Down Banana French Toast for dinner tonight. I got the recipe from My DIY Life, if you follow the link you can have it too! I made my own cinnamon swirl bread to use in it, and I also used almonds instead of walnuts because that's what I had on hand. It was amazingly delicious, and it's definitely going on our family favorites list!

Thursday, December 16, 2010

Flower Pins


Like I said, my hot glue gun and I are becoming the best of friends lately... I only burnt my finger once during this project! Yay me. I have absolutely fallen in love with these cute little flower pins that I saw at Jones Design Company. Lucky for me, and you, they posted this tutorial a while ago about how they actually make them. Happiest day ever!!! I really loved the ones they did out of felt, they were really full and rich looking. I, however, didn't have any felt on hand. And I definitely didn't want to go to the store just for felt in two feet of snow and negative degree weather. So I pulled out some regular fabric scraps from my stash that I've acquired from my mom and my grandma.


I cut out 7 flower shapes, similar to the ones in the tutorial I followed, and then folded them in half twice, and put the glue on the end. Then I glued these pieces to a circle that I already cut out of the same fabric for the base of the flower.


This is the bottom of my completed flower, and the circle that I glued they other petal pieces to.


Cute little floofy things, aren't they?


This polka dot one is my favorite so far. I'm excited to find some felt one of these defrosted days to see how those ones turn out, because I'm loving these. My little miss g loves them too, on her skirt.


And here's a random comment,  I happened to come across some quick decorating tips that I actually liked: Click here to see what I found. Merry Christmas in 9 days!


LinkWithin

Related Posts Plugin for WordPress, Blogger...