Pages

Showing posts with label Craft. Show all posts

Friday, July 15, 2011

Dresser Redo


When we got married and moved into an apartment that was unfurnished we realized the luxury of owning a dresser. Which we didn't. We had to go buy one and then put it together- we were so desperate to have one immediately that we didn't even take the time to try to find a good used one. Well, okay, to be fair to ourselves we did look for a minute, but didn't find anything that looked like it hand't been sent through the dishwasher a couple times.


So, when my sister got married in May I put on my thinking cap for gift ideas. "Maybe she would like somewhere to put their clothes?" I thought. Genius.
My mom and I did the mighty garage sale hunt to find a good used dresser, and we found this lovely blue solid wood one. Lucky for us it didn't even smell bad.

The blue paint job wasn't sealed at all, so we could just paint right over it without having to scrape or sand any of the previous layers off. Great deal for us!  Two of my younger sisters helped me paint and redo this dresser. It was such a fun and easy project!


We used two coats of a creamy beige paint for the base. Once that was dry we tossed on a bunch of wood stain and then wiped it off with a towel. All the stain that was left was in the crevices and cracks, leaving it with a really great antique-look finish. I loved how this dresser turned out so much that I wanted to keep it for myself. Our newly wed sister was so surprised with this gift, and she loves it just as much as I do. I don't think I'll be getting it back anytime soon!


Monday, July 11, 2011

Yoyo Hair Clippy

I made these hairclips with my sister, Nan. 
Her little girl and my miss G were born within four days of each other. 
At the same hospital. 
By the same doctor.
Cousin twins!
So, naturally, we have to make matchy things  for them to wear....


Start with a circle of fabric, 
stitch with a needle and thread around the entire edge,
and pull the thread tight
making all the edges come together
creating the Yoyo:


Glue your desired hair fastener on the back:
We used hot glue.


And glue something pretty on the front. 
We used my moms amazing assortment of buttons
and came up with all sorts of cute hair clips.


It's nice to have some of these on hand to give as gifts as well.

Monday, May 23, 2011

Special Occasion: Purple


Well, here is the long awaited for reveal of one thing that I made for my sisters wedding. You know how sometimes you spend an hour or more trying to make something really creative and cute and it turns out looking like an art project from 1st grade? That's how it turned out. I made a pair of earrings for myself to wear. I needed something purple and pretty, and didn't want to spend much.  I didn't spend a penny, they turned out purple, but they sure didn't turn out pretty....back to the drawing board! Round two went much smoother, and they took about 15 minutes. I love it when that happens! Except for the previous hour that went down the drain. Lesson learned. Simplify.


Thursday, May 5, 2011

New Earring Design


I came up with some new earrings this week
using what I already had in my craft stash


I used my old beads
that I've never even thought of using
because they were u-hu-gly.
Drab to Fab with these babies, for sure.
I also used some of my hand me down fabric 
from my Grandma  last summer.
I really love how these turned out,
they are just in time for spring and summer!


I also started a facebook page for {MDD} to see if we can get more people involved in our link up parties in the future. (There's one starting tomorrow!) So, go ahead and "like" this website right over there on my sidebar----> (and scroll down) and get the word spreading around. Or just push "like" so I feel like somebody actually read this all the way to the end. 
Bless your heart.


<Photobucket

Wednesday, March 30, 2011

Rat-a-Tat-Tat


In my family history line on my moms side, I have a Great Grandmother who was blind. My mom tells me about her Grandma, Amy Richards Taylor, who would sit and do handwork for hours on end. If that isn't amazing enough, she was an expert at Tatting Lace. When I was twelve or thirteen my mom taught me how to tat a teeny tiny little sampler, and that was enough patience spent on the subject for me at the time. I was done. Through the years, I ended up being the only "next generation" tatter in the family line. That being the case, Great Grandma's well used tatting shuttle was entrusted to my not-so-impressed teenage care. 

I'll be very honest. The tatting shuttle sat in my handwork box (with all my other handwork doo-dah's) for.... let's see... gotta do some math.... almost ten years? Yep. That's about it. 

Well, my mom came for a visit a couple weeks ago (just in case you forgot...), and with another one of her daughters getting married, sentimental and pretty things are in need. She was sitting on my couch tatting with her own shuttle in hand, making a long chain of lace to use on something for the bride. Luckily my mom is a genius at anything handwork-ish, and she is very patient too. I dug out my shuttle (that was still wound with some thread that neither me or my mom wound on it) and put my mom to work! She taught me how to tat again, and I have to say that this time around I am a bit more interested, to say the least!

It's amazing to me that I can make lace with my hands (well, quite slowly. I'm not that great....), I can do something my Great Grandma passed down the line to me. I didn't ever get to meet her, or my Grandma, but they gave something special to me (okay, besides my really neat mom... I kind of thought that was a given). They gave me the knowledge of a  hobby, and maybe a talent. I think that's pretty cool.


Wednesday, March 16, 2011

Monkeyin' Around


Look what my sister made!! This little friend is so adorable. 
My sister made this for miss g for her birthday.
Miss g sleeps with this little friend right by her side
and makes it hop around on her bed.


Knitted by hand and so stinkin' cute. I love this little monkey!


Sunday, March 13, 2011

Quick Cards Tutorial


I pulled out my scrap paper the other night to write a couple notes to some of my favorite people. I cut one cute paper in half and turned it over to write my message on the back of it. Just as my pen was about to touch the paper I thought, "What am I doing? That would be super lame to just have a note scrawled across the back of a plain piece of scrap paper!" I pulled out more paper, and my needle and thread, and made some really great cards in no time.

Here is what I came up with:

Cut out the paper, fold the big one in half for the card base

Stitch from front to back, 
leaving the tail long enough to use for a knot

Stitch from back to front, 
leaving a little space between the two stitches
so the paper won't rip

Tie a knot, trim off the excess thread. 

And done- Cute cards instead of lame notes!
I love it when that happens.

Thursday, March 10, 2011

Book Page Wreath


I made another one of these babies for my sister while I was in Utah last. Since I live a gazillion miles away from all my super neat sisters, they haven't seen some of my stuff I've made recently in person. As they watched me make this wreath they were saying things like "You are still working on that?" and "That's alot bigger than I thought it was going to be..."


"yep." was my response to both of those comments

I love making these book page wreaths huge because it makes a statement for the room that it's placed in. It is noticed, and it's simple. Well, simple besides the fact that it takes a hundred years to make (okay, more like 5 or 6 hours....same thing) This particular wreath was made out of an old Miss Manners book, so of course I had to sit and read a few of the paragraphs as I was making the wreath! These big wreaths are such an easy way to dress up a huge blank wall without breaking the bank, I know everyone's gotta love that!

Monday, February 28, 2011

A Two


It's a special birthday preview! I made this cute little (wait, ...big?) 2 for miss g's shirt, because she is turning two this week! I can't believe she is already two years old. We had my hubby's family here for the weekend to celebrate, and her birthday is later this week, and then my mom is also going to come for another celebration next week. I decided she needed something 2-ish to wear for all three occasions to make it special.


My hubby helped me pick out the fabric from my stash of odds and ends, and he also stopped in at the fabric store to grab me some interfacing while he was out running errands as well. What an amazing guy! It turned out great, I love the raw edges and the big stitches in pink. Miss g was just as excited to watch me cut it out as she was to wear it for the first time. She loves it whenever we make something for her. "Mommy made it, my birf-deee!"


Linking up to craft parties:


The DIY Show Off


Friday, February 18, 2011

Lucky for You


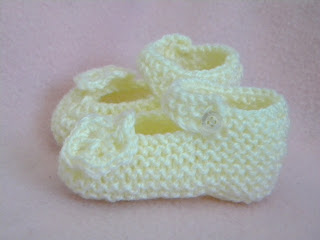
Even though I've been married for three years, I would still consider myself a novice to all of this domesticness    (spell check just told me that's not a real word... oh well) going on around here. For example, knitting a pair of baby booties. I've seen it done. I have the skills. I just haven't done it yet (well, hadn't, anyway). That's where the lucky you part comes in. You get to see the very first pair that I've ever knitted in my entire life!


They turned out so great! I was so excited about these adorable little shoes that I decided to alter the pattern a little and come up with a design that was just a tad different. "What is that?" said hubby nodding in the direction of my 'new design' that was complete. "I have no idea!" I said as I gracefully flung it into the trash can. It was Uh.Gly. And so, dearest reader, that is why all of these pictures are of the same one pair of booties. That same pair that I made for the very first time in my life. Lucky you!


Tuesday, February 1, 2011

Wood Blocks


My hubby and I decided to make some blocks for our miss G for Christmas just recently. She didn't have any blocks of any kind to play with, and now that she is learning colors and letters we decided it would be so perfect for a Christmas gift! My hubby used some of the left over wood from the deck he built in the fall and cut them nice and small to fit in her cute little hands. He also sanded the edges and corners so they weren't too sharp. They looked so beautiful when he was done! Now it was my turn.


I dug out my painting supplies and tried to think of how creative I wanted to get with my three whole bottles of paint. Luckily the three colors we had were red, blue, and yellow. Perfect! I could mix whatever colors I wanted! I decided to go with some bright rainbow colors... ahem, except for the purple. That guy was just a little dark, but I didn't have any white on hand... oh well. Such is life. Sometimes the purple is just dark.


After a couple coats of paint and some amazing sharpie skills, these blocks turned out so cute! Miss G was absolutely delighted when she opened them up, and she loves playing with them. She loves to see the colors and the letters and the pictures. Her favorite game is knocking over the tall block towers that we build for her. Of course. Who doesn't love knocking those over?

LinkWithin

Related Posts Plugin for WordPress, Blogger...